widget桌面插件
小组成员: 刚占慧 邱源 汤炀 谢亮 章伟 最终完成日期:15年11月29日
一、简介
本模块主要是完成天气预报项目的桌面插件功能
二、基础知识
桌面插件的开发主要使用的Android中的AppWidget框架
AppWidget框架
1、AppWidgetProvider :继承自 BroadcastRecevier , 在AppWidget 应用 update、enable、disable 和 delete 时接收通知。其中,onUpdate、onReceive 是最常用到的方法,它们接收更新通知。
2、 AppWidgetProvderInfo:描述 AppWidget 的大小、更新频率和初始界面等信息,以XML 文件形式存在于应用的 res/xml/目录下。
3、AppWidgetManger :负责管理 AppWidget ,向 AppwidgetProvider 发送通知。
4、RemoteViews :一个可以在其他应用进程中运行的类,向 AppWidgetProvider 发送通知。AppWidget 框架的主要类介绍
AppWidgetManger类
getAppWidgetInfo(int appWidgetId): 通过AppWidgetId 获取 AppWidget 信息
bindAppWidgetId(int appWidgetId, ComponentName provider): 通过给定的ComponentName 绑定appWidgetId
getAppWidgetIds(ComponentName provider): *通过给定的ComponentName 获取AppWidgetId
getAppWidgetInfo(int appWidgetId): 通过AppWidgetId 获取 AppWidget 信息
getInstalledProviders(): 返回一个List< AppWidgetProviderInfo>的信息
getInstance(Context context): 获取 AppWidgetManger 实例使用的上下文对象
updateAppWidget(int[] appWidgetIds, RemoteViews views): 通过appWidgetId 对传进来的 RemoteView 进行修改,并重新刷新AppWidget 组件
updateAppWidget(ComponentName provider, RemoteViews views): 通过 ComponentName 对传进来的 RemoeteView 进行修改,并重新刷新AppWidget 组件
updateAppWidget(int appWidgetId, RemoteViews views) 通过appWidgetId 对传进来的 RemoteView 进行修改,并重新刷新AppWidget 组件继承自 AppWidgetProvider 可实现的方法为如下:
onDeleted(Context context, int[] appWidgetIds)
onDisabled(Context context)
onEnabled(Context context)
onReceive(Context context, Intent intent)
Tip:因为 AppWidgetProvider 是继承自BroadcastReceiver 所以可以重写onRecevie 方法,当然必须在后台注册Receiver 5、onUpdate(Context context, AppWidgetManager appWidgetManager, int[] appWidgetIds)
三、主要思路及步骤
3.1 主要思路 一般Widget设计步骤如下
- 第一个xml是布局XML文件(如:weather_widget.xml),是这个widget的布局。
- 第二个xml是mywidget.xml,主要是用于声明一个appwidget的。
- 第三个xml是AndroidManifest.xml,注册broadcastReceiver信息。
最后一个Java类用于做一些业务逻辑操作。让其继承类AppWidgetProvider
上述涉及到的文件及其目录情况如下:

3.2 实践步骤
weather_widget.xml布局主要有三个控件,分别为显示时间的TextView、显示天气信息的TextView和显示天气图标的ImageView,代码如下:
<?xml version="1.0" encoding="utf-8"?> <LinearLayout xmlns:android="http://schemas.android.com/apk/res/android" android:orientation="vertical" android:layout_width="match_parent" android:layout_height="match_parent" android:layout_centerHorizontal="true"> <TextView android:layout_width="wrap_content" android:layout_height="wrap_content" android:text="Large Text" android:id="@+id/time" android:gravity="center"/> <TextView android:layout_width="wrap_content" android:layout_height="wrap_content" android:text="Large Text" android:id="@+id/temperature"/> <ImageView android:id="@+id/image" android:layout_width="wrap_content" android:layout_height="wrap_content" android:src="@drawable/tq"/> </LinearLayout>- 建立Widget内容提供者文件,我们在res下建立xml文件夹,并且新建一个mywidget.xml代码入下:
<?xml version="1.0" encoding="utf-8"?>
<appwidget-provider xmlns:android="http://schemas.android.com/apk/res/android"
  android:minWidth="300dip" android:minHeight="72dp"
  android:updatePeriodMillis="1000"
  android:initialLayout="@layout/weather_widget"
  >
</appwidget-provider>
修改配置文件AndroidManifest.xml,后台注册Receiver,代码如下:
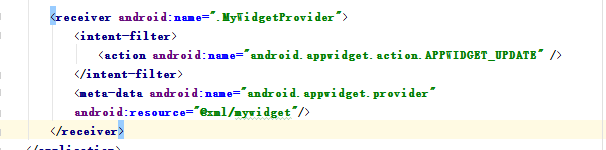
<?xml version="1.0" encoding="utf-8"?> <manifest xmlns:android="http://schemas.android.com/apk/res/android" package="com.itsucks.mywidget" android:versionCode="1" android:versionName="1.0"> <uses-permission android:name="android.permission.INTERNET"/> <application android:allowBackup="true" android:icon="@mipmap/ic_launcher" android:label="@string/app_name" android:supportsRtl="true" android:theme="@style/AppTheme"> <activity android:name=".MainActivity"> <intent-filter> <action android:name="android.intent.action.MAIN" /> <category android:name="android.intent.category.LAUNCHER" /> </intent-filter> </activity> <receiver android:name=".MyWidgetProvider"> <intent-filter> <action android:name="android.appwidget.action.APPWIDGET_UPDATE" /> </intent-filter> <meta-data android:name="android.appwidget.provider" android:resource="@xml/mywidget"/> </receiver> </application> </manifest>- 写一个类继承自AppWidgetProvide
package com.itsucks.mywidget;
import android.appwidget.AppWidgetManager;
import android.appwidget.AppWidgetProvider;
import android.content.ComponentName;
import android.content.Context;
import android.content.Intent;
import android.graphics.Bitmap;
import android.graphics.BitmapFactory;
import android.widget.RemoteViews;

import java.io.IOException;
import java.io.InputStream;
import java.net.HttpURLConnection;
import java.net.URL;
import java.text.DateFormat;
import java.text.SimpleDateFormat;
import java.util.Date;
import java.util.Locale;
import java.util.Timer;
import java.util.TimerTask;

import com.show.api.ShowApiRequest;

import org.json.JSONException;
import org.json.JSONObject;

/**
 * Created by zhangwei on 2015/11/29.
 */
public class MyWidgetProvider extends AppWidgetProvider{

    @Override
    public void onUpdate(Context context, AppWidgetManager appWidgetManager,
                         int[] appWidgetIds){
        // TODO Auto-generated method stub
        //显示时间的定时器,每秒刷新一次
        Timer timer = new Timer();
        timer.scheduleAtFixedRate(new MyTime(context, appWidgetManager), 1, 1000);
        //显示天气的定时器,设置为没小时刷新一次
        Timer wTimer = new Timer();
        wTimer.scheduleAtFixedRate(new MyWeather(context, appWidgetManager), 1, 3600000);
        super.onUpdate(context, appWidgetManager, appWidgetIds);
    }
    @Override
    public void onReceive(Context context, Intent intent)
    {
        super.onReceive(context, intent);
    }

    //显示时间信息处理
    public class MyTime extends TimerTask {
        RemoteViews remoteViews;
        AppWidgetManager appWidgetManager;
        ComponentName thisWidget;
        DateFormat format = SimpleDateFormat.getTimeInstance(SimpleDateFormat.MEDIUM, Locale.getDefault());
        public MyTime(Context context, AppWidgetManager appWidgetManager) {
            this.appWidgetManager = appWidgetManager;
            remoteViews = new RemoteViews(context.getPackageName(), R.layout.weather_widget);
            thisWidget = new ComponentName(context, MyWidgetProvider.class);
            }
        @Override
        public void run() {
         remoteViews.setTextViewText(R.id.time, format.format(new Date()));
            appWidgetManager.updateAppWidget(thisWidget, remoteViews);
         }
        }
    //显示天气信息处理
    public class MyWeather extends TimerTask {
        RemoteViews remoteViews;
        AppWidgetManager appWidgetManager;
        ComponentName thisWidget;
        public MyWeather(Context context, AppWidgetManager appWidgetManager) {
            this.appWidgetManager = appWidgetManager;
            remoteViews = new RemoteViews(context.getPackageName(), R.layout.weather_widget);
            thisWidget = new ComponentName(context, MyWidgetProvider.class);
        }
        @Override
        public void run() {
            String temp = "";
            String city = "大兴";
            String image_url="";
            try {
            //此处笔者用的是“易源接口”提供的API,下面的***分别代表你应用的appid和secretid
                String info = new ShowApiRequest("http://route.showapi.com/9-2","****","*********")
                        .addTextPara("areaid","101050701")
                        .addTextPara("area",city)
                        .addTextPara("needMoreDay","0")
                        .addTextPara("needIndex","0")
                        .addTextPara("needHourData","0")
                        .post();
                //获取接口返回的信息
                JSONObject wholeInfo = new JSONObject(info);
                JSONObject showapi_res_body  = wholeInfo.getJSONObject("showapi_res_body");
                JSONObject now  = showapi_res_body.getJSONObject("now");
                temp = now.getString("temperature")+"℃";
                image_url = now.getString("weather_pic");
                Bitmap weather_pic = getBitmap(image_url);
                System.out.println("temp:"+temp);
                remoteViews.setTextViewText(R.id.temperature, city +":"+ temp);
                if(weather_pic!=null){
                    remoteViews.setImageViewBitmap(R.id.image,weather_pic);
                }
                appWidgetManager.updateAppWidget(thisWidget, remoteViews);
            } catch (JSONException e) {
                e.printStackTrace();
                remoteViews.setTextViewText(R.id.temperature, city+":-5℃");
                appWidgetManager.updateAppWidget(thisWidget, remoteViews);
            }catch (IOException e){
                e.printStackTrace();
            }
        }
        //根据天气图标url从网络获取图片
        public Bitmap getBitmap(String path) throws IOException {
            URL url = new URL(path);
            HttpURLConnection conn = (HttpURLConnection)url.openConnection();
            conn.setConnectTimeout(5000);
            conn.setRequestMethod("GET");
            if(conn.getResponseCode() == 200){
                InputStream inputStream = conn.getInputStream();
                Bitmap bitmap = BitmapFactory.decodeStream(inputStream);
                return bitmap;
            }
            return null;
        }
    }
}
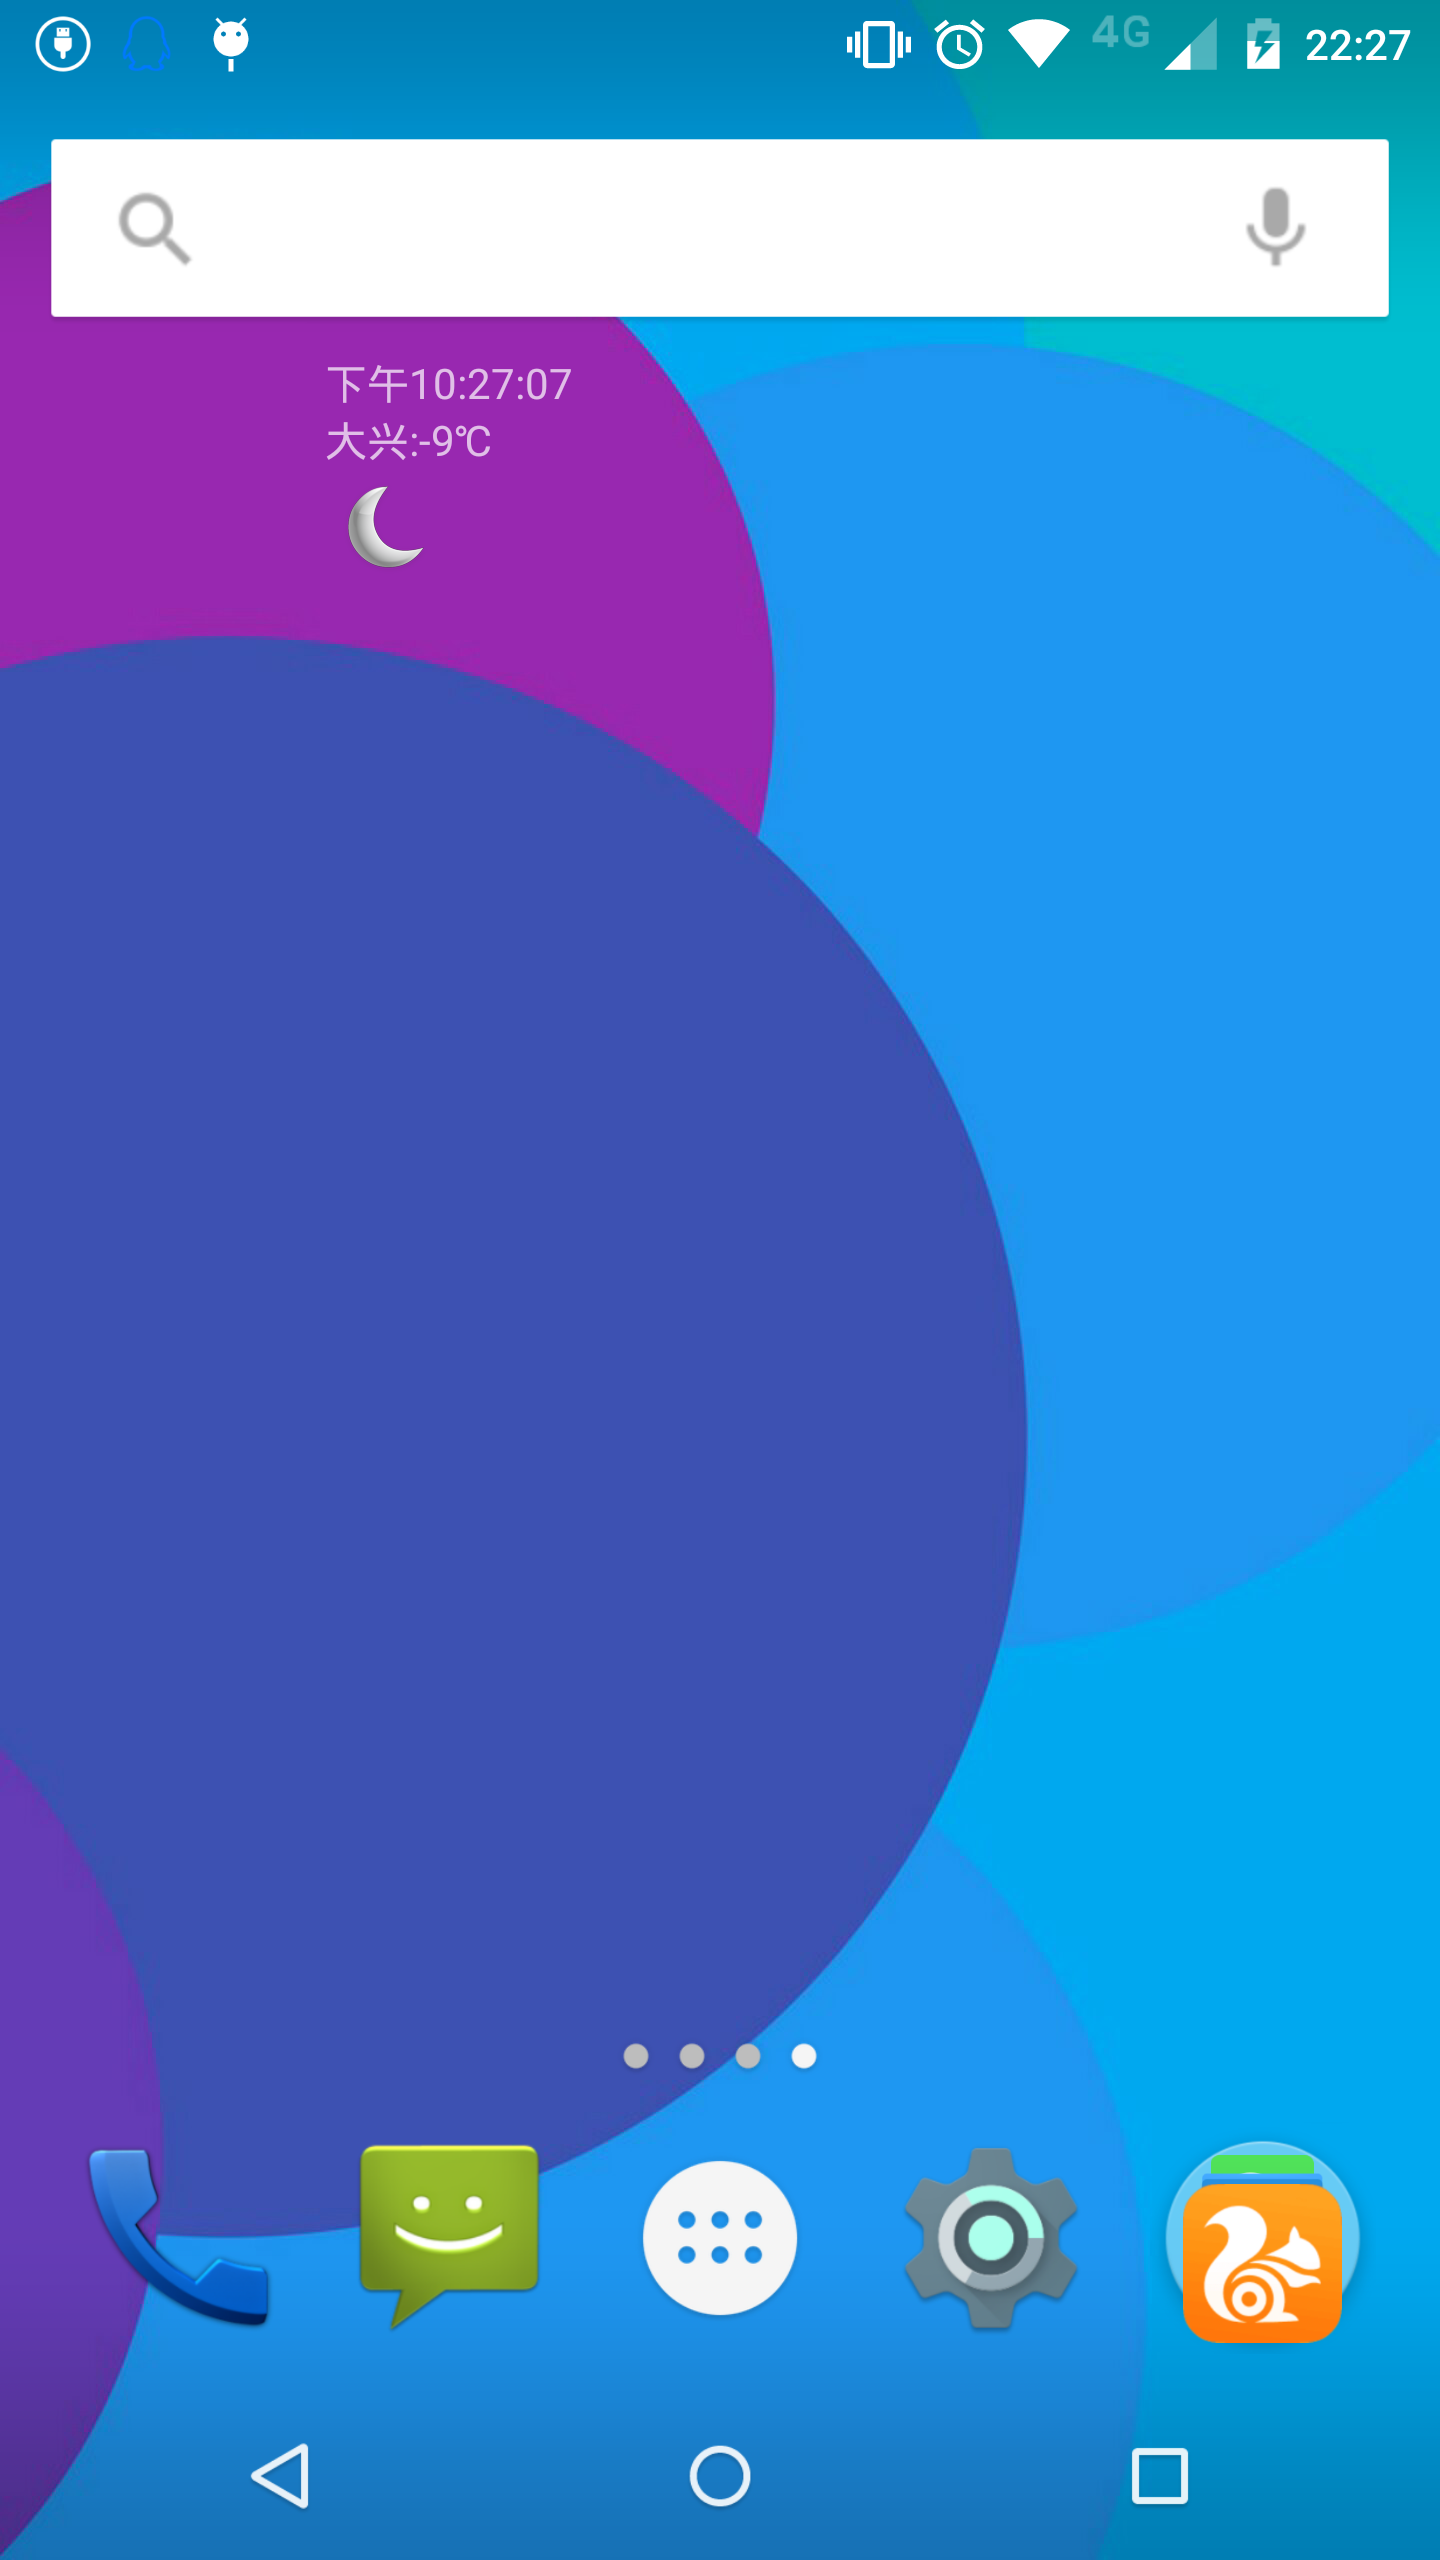
天气插件实现如下截图
 四、常见问题及注意事项
AndroidManifest.xml中注册Receiver一定要严格按照下面的写法,否则很有可能注册失败,找不到插件
- 由于要用到网络,不要忘了开网络权限